Self‑hosting di Ente Foto con Docker Compose e Backblaze B2
Ente Foto è un servizio per l’archiviazione e la sincronizzazione di foto e video con una forte attenzione alla privacy. Per funzionalità ricorda Google Foto o Apple Foto (backup automatico, app mobile, organizzazione per album), ma con una differenza fondamentale: crittografia end‑to‑end e possibilità di hostarlo sul proprio server.
In questo articolo racconto la mia esperienza di installazione di Ente Foto in un ambiente di test, utilizzando Docker Compose e come storage un bucket S3 compatibile su Backblaze B2.
Mi sono basato sulla documentazione ufficiale di Ente e sugli appunti di alcuni amici nerd, adattando il tutto alla mia infrastruttura.
Perché Ente Foto
Se stai cercando un’alternativa self‑hosted a Google Foto che non sacrifichi la privacy, Ente è una delle soluzioni più interessanti oggi disponibili:
- Crittografia end‑to‑end reale
- Supporto a storage S3 compatibili
- App ufficiali (Android, iOS, desktop)
- Installazione relativamente semplice via Docker
L’unico vero requisito è avere un minimo di confidenza con Docker e con la gestione di servizi web.
Prerequisiti
Nel mio setup ho utilizzato:
- Sistema operativo Linux (Debian 13)
- Docker e Docker Compose installati
- Un bucket S3 su Backblaze B2
Naturalmente puoi adattare la guida ad altre distribuzioni Linux o ad altri provider S3 compatibili.
Preparazione docker docker-compose.yaml
Per iniziare prepariamo il docker-compose.yaml
mkdir ente
vi docker-compose.yaml
con il contenuto:
services:
  museum:
    image: ghcr.io/ente-io/server
    ports:
      - 127.0.0.1:8080:8080 # API
    depends_on:
      postgres:
        condition: service_healthy
    volumes:
      - ./museum.yaml:/museum.yaml:ro
      - ./data:/data:ro
    restart: unless-stopped
    healthcheck:
      test: ["CMD", "wget", "--quiet", "--tries=1", "--spider", "http://localhost:8080/ping"]
      interval: 60s
      timeout: 5s
      retries: 3
      start_period: 120s

  # Resolve "localhost:3200" in the museum container to the minio container.
  socat:
    image: alpine/socat
    network_mode: service:museum
    depends_on: [museum]
    restart: unless-stopped
    command: "TCP-LISTEN:3200,fork,reuseaddr TCP:minio:3200"

  web:
    image: ghcr.io/ente-io/web
    # Uncomment what you need to tweak.
    ports:
      - 127.0.0.1:3000:3000 # Photos web app
      - 127.0.0.1:3001:3001 # Accounts
      - 127.0.0.1:3002:3002 # Public albums
      - 127.0.0.1:3003:3003 # Auth
      - 127.0.0.1:3004:3004 # Cast
      - 127.0.0.1:3005:3005 # Share
      - 127.0.0.1:3006:3006 # Embed
      - 127.0.0.1:3008:3008 # Paste
    # Modify these values to your custom subdomains, if using any
    restart: unless-stopped
    environment:
      ENTE_API_ORIGIN: https://api.ente.example.it
      ENTE_ALBUMS_ORIGIN: https://albums.ente.example.it
      ENTE_PHOTOS_ORIGIN: https://foto.example.it

  postgres:
    image: postgres:15
    environment:
      POSTGRES_USER: pguser
      POSTGRES_PASSWORD: supersecurepassword
      POSTGRES_DB: ente_db
    restart: unless-stopped
    healthcheck:
      test: pg_isready -q -d ente_db -U pguser
      start_period: 40s
      start_interval: 1s
    volumes:
      - ./postgres-data:/var/lib/postgresql/data

  minio:
    image: minio/minio
    ports:
      - 127.0.0.1:3200:3200 # MinIO API
      # Uncomment to enable MinIO Web UI
      # - 3201:3201
    restart: unless-stopped
    environment:
      MINIO_ROOT_USER: minio-user
      MINIO_ROOT_PASSWORD: minio_supersecurepassword
    command: server /data --address ":3200" --console-address ":3201"
    volumes:
      - ./minio-data:/data
    post_start:
      - command: |
          sh -c '
          #!/bin/sh

          while ! mc alias set h0 http://minio:3200 minio-user minio_supersecurepassword 2>/dev/null
          do
            echo "Waiting for minio..."
            sleep 0.5
          done

          cd /data

          mc mb -p b2-eu-cen
          mc mb -p wasabi-eu-central-2-v3
          mc mb -p scw-eu-fr-v3
          '
Preparazione dei file di configurazione
Nella stessa directory dove abbiamo crato il file docker-compose.yaml creiamo il file di configurazione di museum
File museum.yaml
vi museum.yaml
db:
      host: postgres
      port: 5432
      name: ente_db
      user: pguser
      password: supersecurepassword

s3:
      # Top-level configuration for buckets, you can override by specifying these configuration in the desired bucket.
      # Set this to false if using external object storage bucket or bucket with SSL
      are_local_buckets: false
      # Set this to false if using subdomain-style URL. This is set to true for ensuring compatibility with MinIO when SSL is enabled.
      use_path_style_urls: true
      b2-eu-cen:
         # Uncomment the below configuration to override the top-level configuration
         # are_local_buckets: true
         # use_path_style_urls: true
         key: _API_KEY_
         secret: _SECRET_KEY
         endpoint: _URL_ENDPOINT
         region: _REGION_S3
         bucket: _NOME_BUCKET
      wasabi-eu-central-2-v3:
         # are_local_buckets: true
         # use_path_style_urls: true
         key: minio-user
         secret: minio_supersecurepassword
         endpoint: localhost:3200
         region: eu-central-2
         bucket: wasabi-eu-central-2-v3
         compliance: false
      scw-eu-fr-v3:
         # are_local_buckets: true
         # use_path_style_urls: true
         key: minio-user
         secret: minio_supersecurepassword
         endpoint: localhost:3200
         region: eu-central-2
         bucket: scw-eu-fr-v3

# Specify the base endpoints for various web apps
apps:
    # If you're running a self hosted instance and wish to serve public links,
    # set this to the URL where your albums web app is running.
    public-albums: https://albums.ente.example.it
    cast: https://cast.ente.example.it
    # Public locker (share) app
    public-locker: https://share.ente.example.it
    # Public paste app
    public-paste: https://paste.ente.example.it
    # Embed app for embedded album sharing
    embed-albums: https://embed.ente.example.it
    # Set this to the URL where your accounts web app is running, primarily used for
    # passkey based 2FA.
    accounts: https://accounts.ente.example.it

key:
      encryption: _ENCRYPTION_KEY
      hash: _HASH_KEY

jwt:
      secret: _SECRET_KEY
Nel file museum.yaml ho modificato solo le sezioni necessarie, adattandole alla mia installazione.
In particolare:
- Configurazione dello storage S3
- Credenziali e endpoint di Backblaze B2
- Bucket dedicato alle foto
I dati di accesso a Backblaze (key, secret, endpoint) si ottengono una volta creato il bucket dal pannello di controllo.
Bisogna solo modificare i valori:
key secret endopoint bucket
Lasciare inalterati gli altri parametri in quanto sono hardcoded nell'applicazione
Generazione delle chiavi crittografiche
Ente richiede alcune chiavi casuali definite nel file museum.yaml per:
encryptionhashjwt
Per generarle:
encryption
head -c 32 /dev/urandom | base64 | tr -d '\n'
hash
head -c 64 /dev/urandom | base64 | tr -d '\n'
secret
head -c 32 /dev/urandom | base64 | tr -d '\n' | tr '+/' '-_'
Avvio dei container
A questo punto siamo pronti per avviare i container Docker:
docker compose up -d
Reverse proxy con Caddy
Per esporre Ente in HTTPS ho utilizzato Caddy come reverse proxy.
L’installazione e la configurazione di Caddy in Docker sono descritte in dettaglio in questo articolo
Una volta configurato Caddy, è sufficiente creare i VirtualHost in Caddyfile per:
- API
- Albums
- Photos
puntando ai rispettivi servizi Docker di Ente.
# For Museum
api.ente.example.it {
    reverse_proxy http://127.0.0.1:8080
}

# For Ente Photos web app
foto.example.it {
    reverse_proxy http://127.0.0.1:3000
}

# For Ente Accounts web app
accounts.ente.example.it {
    reverse_proxy http://127.0.0.1:3001
}

# For Ente Albums web app
albums.ente.example.it {
    reverse_proxy http://127.0.0.1:3002
}

# For Ente Auth web app
auth.ente.example.it {
    reverse_proxy http://127.0.0.1:3003
}

# For Ente Cast web app
cast.ente.example.it {
    reverse_proxy http://127.0.0.1:3004
}

# For Ente Public Locker web app
share.ente.example.it {
    reverse_proxy http://127.0.0.1:3005
}

# For Ente Embed web app
embed.ente.example.it {
    reverse_proxy http://127.0.0.1:3006
}

# For Ente Paste web app
paste.ente.example.it {
    reverse_proxy http://127.0.0.1:3008
}
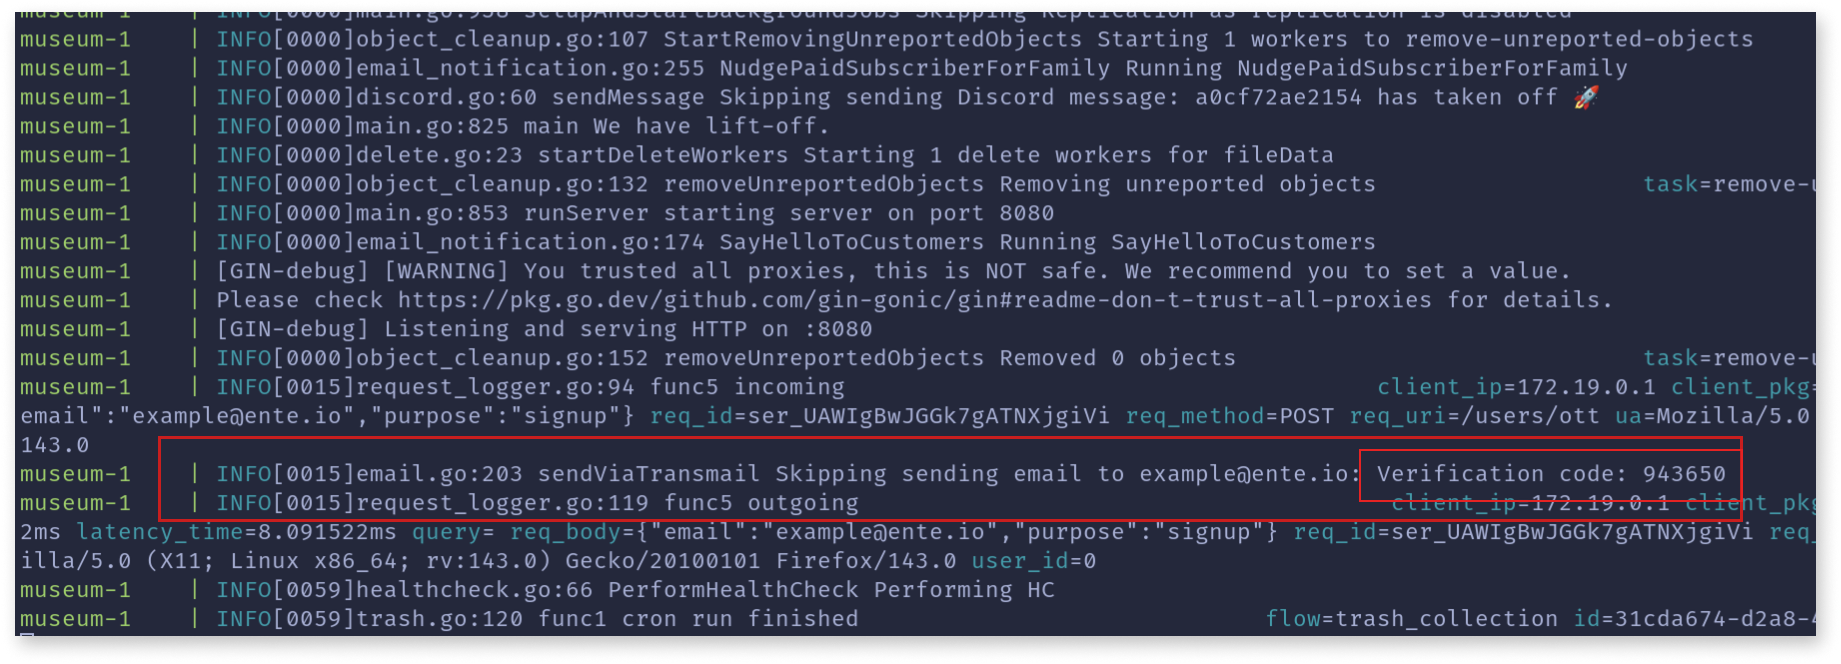
Creazione dell’account e conferma
All’apertura della pagina di login, create un account. Attenzione: non avendo ancora un server SMTP, la conferma via mail non arriverà. Per ottenere il codice di conferma:
docker compose logs
Rimozione dei limiti di storage
Per impostazione predefinita, lo storage è limitato a 10GB. Per rimuovere questo limite è necessario usare Ente CLI.
Utilizzo di Ente CLI tramite docker
Creiamo una nuova directory per ente-cli e all'interno il nostro docker-compose.yaml che sarà:
services:
  ente-cli:
    image: pierinhood/ente-cli:latest
    restart: unless-stopped
    container_name: ente-cli
    volumes:
      - ./cli-data:/cli-data:rw
      - ./export:/data
sempre dentro la directory ente-cli creiamo un'altra directory cli-data e all'interno creiamo il file config.yaml:
endpoint:
    api: "https://api.ente.example.it"
Aggiungiamo ora l’account:
docker compose run ente-cli /bin/sh -c "./ente-cli account add"
Una volta aggiunto, recuperiamo lo user ID
docker compose run ente-cli /bin/sh -c "./ente-cli account list"
Rendiamo l’utente admin modificando museum.yaml e inserendo in fondo al file:
internal:
    admin: _USER_ID_
Riavviare il container ente:
docker compose down && docker compose up -d
Infine, rimuoviamo il limite dello storage:
docker compose run ente-cli /bin/sh -c "./ente-cli admin update-subscription -u email@vostrodominio.tld --no-limit true"
Fix errori CORS con Backblaze
Se non riuscite a caricare o visualizzare foto dalla webapp, potrebbe essere un problema di CORS. Procedura:
- Installare il CLI Backblaze:
wget https://github.com/Backblaze/B2_Command_Line_Tool/releases/latest/download/b2-linux
chmod +x b2-linux
mv b2-linux /usr/local/bin/b2
- Creare una nuova Application Key dall'interfaccia web di BackBlaze e autorizzarsi:
b2 authorize-account
- Creare cors.json e applicarlo al bucket:
[
  {
    "corsRuleName": "entephotos",
    "allowedOrigins": [
      "*"
    ],
    "allowedHeaders": [
      "*"
    ],
    "allowedOperations": [
      "b2_download_file_by_id",
      "b2_download_file_by_name",
      "b2_upload_file",
      "b2_upload_part",
      "s3_get",
      "s3_post",
      "s3_put",
      "s3_head"
    ],
    "exposeHeaders": [
      "X-Amz-Request-Id",
      "X-Amz-Id-2",
      "ETag"
    ],
    "maxAgeSeconds": 3600
  }
]
b2 bucket update --cors-rules "$(<./cors.json)" _NOME_BUCKET_ allPrivate
Apps
L’app Android funziona perfettamente. Per collegare la vostra istanza:
-
Tappare 7 volte il logo per abilitare le opzioni sviluppatore
-
Inserire l’URL delle API, ad esempio:
https://api.ente.example.it